Showing posts with label Latest. Show all posts
July 21, 2016
December 19, 2015

How to add Animated Splash Screen to you Android App using Android Studio
THIS POST IS MOVED TO MY NEW WEBSITE WWW.ANDROIDMKAB.COM CLICK HERE TO READ THE POST
December 04, 2015

XPERIA Cars Road Trip Theme for Xperia C [PORTED]
Hi All I ported XPERIA Cars Road Trip Theme for Xperia C and all Sony Android 4.2.2 Device
Requirements:
1. Rooted Sony Xperia C or any Sony Android 4.2.2 Device
2. ES File Explorer
Installation Procedure:
- Download XPERIA Cars Road Trip Theme for Xperia C and copy it to your SD Card
- Open ES File Explorer and copy file to Device/system/app folder and reboot (Make sure you have given super user permission to ES File Exporer and permissions set to -rw -rw -r)
Note: If you Want to change theme name don't give any spaces in name.
October 15, 2015
Setup Android Studio in offline mode On Windows for Beginners
Android Studio For Beginners
I have explained everything in detail in Video present at bottom of post
Download links for Required files for setting up Android Studio
1. JDK 7
September 12, 2015
August 18, 2015

How to Stop or Disable Windows Updates in Windows 10 all Versions Permanently
Microsoft has removed option to stop windows updates from auto downloading. Which is a major bug because it wastes your bandwidth in background by downloading Windows updates without out knowledge.
This tutorial helps you to stop annoying Windows updates and save your data.
I have Explained every thing in very detail here. Still having problem to follow, don't worry watch video below to see live demonstration.
This tutorial helps you to stop annoying Windows updates and save your data.
I have Explained every thing in very detail here. Still having problem to follow, don't worry watch video below to see live demonstration.
Steps:
1. Press Windows + R on Keyboard
2. You will get window Like Below
3. Type services.msc in Run Window and Click on OK
4.You will get image like below
5. Scroll down until you find Windows Update Right Click On it and Select properties
6. Now Select on Startup type drop down menu and select Disabled
7. Then Click on stop and click on OK
8. Then Close all windows
9. Open This PC and Navigate to C:\Windows\System32\drivers\etc\
10. You Will see a File with name hosts. Copy that file to Desktop and Open it with Notepad++ OR any text editor and add following Lines at bottom as shown in Image below and save it.
# windowsupdate.microsoft.com
127.0.0.1 windowsupdate.microsoft.com
127.0.0.1 www.windowsupdate.microsoft.com
127.0.0.1 v4.windowsupdate.microsoft.com
127.0.0.1 www.v4.windowsupdate.microsoft.com
# windowsupdate.com
127.0.0.1 windowsupdate.com
127.0.0.1 www.windowsupdate.com
127.0.0.1 download.windowsupdate.com
127.0.0.1 www.download.windowsupdate.com
127.0.0.1 v4.windowsupdate.com
127.0.0.1 www.v4.windowsupdate.com
# windowsupdate.microsoft.nsatc.net
127.0.0.1 windowsupdate.microsoft.nsatc.net
127.0.0.1 v4windowsupdate.microsoft.nsatc.net
# wustat.windows.com
127.0.0.1 wustat.windows.com
11. Now copy that file again back to C:\Windows\System32\drivers\etc
12. Windows will ask you replace file click on Continue.
July 03, 2015

Install two Facebook Apps in One Android Phone - No root Required
Install two Facebook Apps in a Single Android Phone. No root required.
Steps:
1. Install Official Facebook App From Play Store
2. Download Facebook 2 App From Here
3. Copy downloaded Facebook 2 App to your Android Phones SD Card and install it Normally.
4. Share this Post With Your Friends as a Token Of thanks
5. Subscribe to our news letter and Like My Facebook Page to serve you better.
DOWNLOAD FACEBOOK 2 APP
June 05, 2015

Facebook Lite For Android Direct Download
This Facebook Lite Version is not available in all Countries. So I bought it for You.
Description
This version of
Facebook is efficient with data and works in all network conditions.
Facebook Lite:
- Installs quickly — the app is less than 1 MB
- Works on all Android phones
- Uses less data
- Is designed for 2G networks and areas with slow or unstable connections
- Installs quickly — the app is less than 1 MB
- Works on all Android phones
- Uses less data
- Is designed for 2G networks and areas with slow or unstable connections
Keeping
up with friends is faster than ever. Facebook is free and always will be.
About Facebook:
- Message friends and have group conversations
- Get notifications when friends like and comment on your posts
- See what friends are up to
- Share updates and photos
- Message friends and have group conversations
- Get notifications when friends like and comment on your posts
- See what friends are up to
- Share updates and photos
Download

[ PORT ] XPERIA™ Mad Max Theme For Sony Xperia C
Description
Xperia™ theme is a new
way to make your Sony Xperia™ device truly personal. Download gorgeous and high
quality themes developed uniquely for your Xperia™ smartphone. Change up to
several hundred graphical assets in a fully integrated and easy-to-use experience.
Specifications:
- Up to 270 graphical
assets
- Including Launcher
and Lockscreen Wallpapers, Xperia™ Home, System UI, System Colors, Platform
Components
- Including Launcher
and Lockscreen Wallpapers, Xperia™ Home, System UI, System Colors
XPERIA™ Mad Max Theme Ported For Sony Xperia C
Full Credits To ME
Requirements:
Rooted Xperia C
Knowledge on Using Root Explorer
Installation Proedure:
1) Download and Copy to your SD Card
2) Using ES File Explorer Copy Mad_max.apk to Device/System/app/
3) Reboot
4) Now go to Themes Apply Mad Max Theme and Enjoy
Download Mad Max Theme
June 03, 2015
Create Custom Xperia Themes For Any Xperia Device Both Android 4.2.2 and Android 4.3 and Above
Requirements:
•1.
JDK Installed
•2.
APK Tool
•3.
APK Signer
•4.
Rooted Xperia Device ( Only For Android 4.2.2 )
•4.1
Smapletheme.apk
•5. Images needed in your theme
•6. Photoshop
•7. Notepad++
Download Links at Bottom of this Post
Watch Below Video For Detailed Explanation
May 10, 2015

Lollipop 5.1K-MOD For Sony Xperia C 2305
CWM Zip By Me
SystemUI By: John Mark Urrera
ScreenShots:
Instrucions:
Download Links:
Lollipop_5.0.1_For Xperia_C2305_Karthik_M.zip
Lollipop_5.1_K-MOD_www.karthiktechfreak.blogpot.com.zip
SystemUI By: John Mark Urrera
ScreenShots:
Instrucions:
1. Your Device Must Be Rooted
2. CWM Recovery Installed
3. Reboot to CWM Recovery
4. wipe data/factory reset=>yes
5. Wipe cache partition=>yes
6. Advanced=>wipe dalvik cahe=>yes
7.+++++Go Back++++++
8.Install zip From SD Card=> Choose Zip From sdcard=> Select Lollipop_5.0.1_For Xperia_C2305_Karthik_M.zip from your sd card
9. Then seect Yes - Install Lolliop 5.0.1 For Xperia C2305
10. After seeing Message Install zip from sd Card Complete Reboot your Device
11. After reboot compete your basic setup.
12. Open your apps menu and open ES File Explorer and do as shown in below screenshots
13. Now close ES File explorer
14. Reboot your Device to CWM REcovery Again
15.Install zip From SD Card=> Choose Zip From sdcard=> Select Lollipop_5.1_K-MOD_www.karthiktechfreak.blogpot.com.zip from your sd card
16. Then seect Yes - Install Lolliop 5.0.1 For Xperia C2305
17. After seeing Message Install zip from sd Card Complete Reboot your Device
18. If you see Pure Xperia Is upgrading. Success Yenjoy.
Share My Work If You Enjoy....
Download Links:
Lollipop_5.0.1_For Xperia_C2305_Karthik_M.zip
Lollipop_5.1_K-MOD_www.karthiktechfreak.blogpot.com.zip
May 04, 2015
Pure Lollipop SystemUI For Sony Xperia C
I am not responsible if you brick the device. Read instructions carefully before proceeding
CWM Zip By Me
Full Credits To: John Mark Urrera
ScreenShots:
Instrucions:
1. Your Device Must Be Rooted
2. CWM Recovery Installed
3. You must install [ROM] Android Lollipop 5.0.1 For Sony Xperia C 2305 before flashing below zip file
4. Download Pure Lollipop SystemUI for Xperia C.zip from Link Below
5. Copy It to SD Card Root ( Not into Any other Folder )
6. Reboot to CWM Recovery
7. Install Zip from Sd Card=>Choose Zip From SD Card=> Select Pure Lollipop SystemUI for Xperia C.zip=> Select Yes
8. After Flashing Reboot Your Device
9. See a Notification Pure Xperia Upgrading Succes ( Enjoy.........!)
Download From Here
Full Credits To: John Mark Urrera
ScreenShots:
Instrucions:
1. Your Device Must Be Rooted
2. CWM Recovery Installed
3. You must install [ROM] Android Lollipop 5.0.1 For Sony Xperia C 2305 before flashing below zip file
4. Download Pure Lollipop SystemUI for Xperia C.zip from Link Below
5. Copy It to SD Card Root ( Not into Any other Folder )
6. Reboot to CWM Recovery
7. Install Zip from Sd Card=>Choose Zip From SD Card=> Select Pure Lollipop SystemUI for Xperia C.zip=> Select Yes
8. After Flashing Reboot Your Device
9. See a Notification Pure Xperia Upgrading Succes ( Enjoy.........!)
Download From Here
April 27, 2015
April 26, 2015

Xposed Installer and Modules CWM Flashable ZIP
This CWM Flash-able Package Contains
1. Xposed Installer
2. Gravity Box
3. Xperia Xposed
Instructions:
1. Download Flashable Zip and Copy it to SD Card Root
2. Reboot to CWM Recovery
3. Flash ZIP File
4. Wipe Cache
5. Wipe Dalvik Cache
6. Reboot and Enjoy

Xperia Xposed [Xposed Module] For Sony Xperia C
Requirements:
For Sony Xperia Devices Only
Xposed framework Installed
Instructions:
Download Xperia Xposed.apk and install it
Open Xposed Installer=>Modules=>Tick Mark Xperia Xposed as Showed in Above Screen Shot
And Reboot Your Device
After Reboot Open Xperia Xposed To porform Various Tweaks

Gravity Box [Xposed Module] For Xperia C
Requirements:
Xposed framework Installed
Instructions:
Download Gravity Box 3.5.5.apk and install it
Open Xposed Installer=>Modules=>Tick Mark Gravitybox as Showed in Above Screen Shot
And Reboot Your Device

Xposed Installer For Xperia C
How to install:
Your device Must be rooted
First step for everything you do: Create a nandroid backup and make sure you know how to restore it!
I'm not responsible for anything you do with your phone
There is also the risk to soft-brick your device. In such a case, see below for ways to recover from it.
Installation of the framework:
Download the Xposed Installer APK and install it
Launch the Xposed Installer, go to the "Framework" section and click on "Install/Update"
Reboot
Done!
You can verify this by starting the Xposed Installer again and making sure that the numbers in the "Framework" section are green.
Or It should like First Screenshot In this Post
Installation of any modules:
Download <module>.apk (e.g. via the builtin repository browser) and install it
Launch the Xposed Installer and go to the "Modules" section (you will also get there if you click on the notification warning you that the module is not enabled yet)
Enable the module by checking the checkbox
Reboot
Done!
(note that you can install the framework and enable/disable multiple modules at once and reboot afterwards)

Dolby Digital Plus For Sony Xperia C [ MOD ]
Install Using CWM Recovery
BACKUP YOUR CURRENT ROM BEFORE FLASHING THISUninstall Viper FX or anyother mod you are using in your phone before installing dolby plus
Download & copy Dolby Digital Plus By Karthik M.zip to SD Card
Reboot into recovery
Install the Dolby Digital Plus By Karthik.zip
Wipe cache and dalvik cache
Reboot system now
Finished and enjoy High Quality Music Experience on Your Headphones
April 25, 2015

Stylish Font For Sony Xperia C
Instructions
1. Download and Copy Stylish Font For Xperia C By Karthik M.zip to SD Card Root
2. Rebot your Device to CWM Recovery
3.Install Zip From Sd card=>Chhose Zip from SD CArd=>Select Stylish Font For Xperia C By Karthik M.zip=>Yes
4. Reboot your Device and Enjoy
5. Like My
Page
Subscribe to:
Posts (Atom)


Open ES File Explorer
Select tools from Menu
Super User will ask u permisseion tap on Grant
After Root explorer is ON tap on root explorer
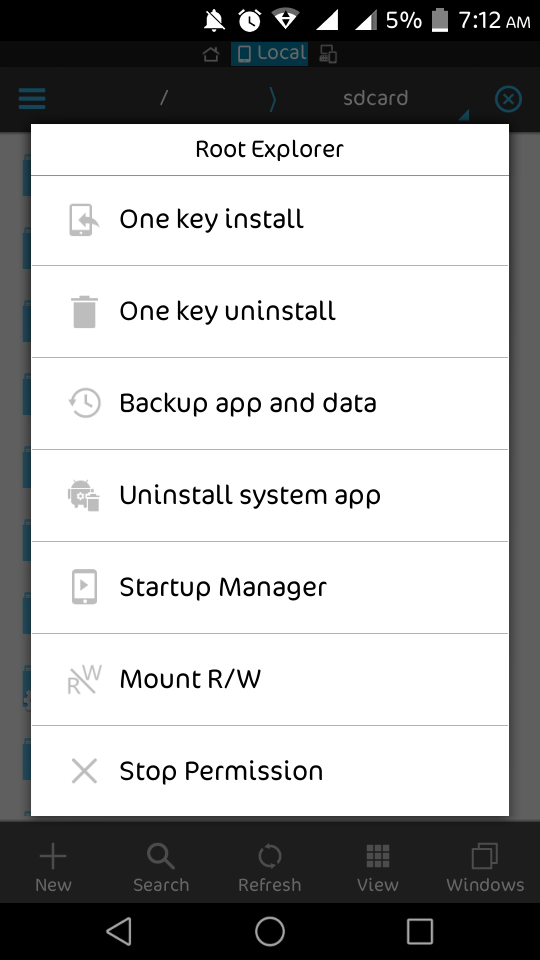
Change Options like in Below Image and tap OK
Click OK